Search This Blog

Wednesday, 29 August 2012

Daily Site Backup with Windows Task Scheduler


To take SharePoint site backup daily at a specific time, you have to create a task for this in Task Scheduler. In this post I am going to explain the steps to achieve this

Scenario:
Take a SharePoint site backup daily with mail notification

Steps:
      1.       Open a notepad and write the backup script and notification details, then save the file with the extension .ps1 (PowerShell Script file)
      2.       Go to Task Scheduler


 3.       Create a Task


4.       Configure setting when the task should run


5.       Configure what action should perform this task
a.       In our case we have to open the PowerShell.exe then
b.      Execute the script saved in a .ps1 file (So we have to locate the file path)


Done, now we have created a task to run the SharePoint site backup daily, to verify check the status of our task and Trigger time. 


You can download the backup script here

Thanks

Wednesday, 22 August 2012

Unrecognized attribute 'allowInsecureTransport'. Note that attribute names are case-sensitive

I have installed SharePoint Server 2010 on windows 7 and started working on that, I encountered an error "Unrecognized attribute 'allowInsecureTransport'. Note that attribute names are case-sensitive" after done FBA configuration.

When opening the FBA site, suddenly  i got this error, Then i come out the solution and reason for this error. This error might fall one of the following reasons

1. You will get this error, when you are trying to create any site using "Access Database service"  like BDC or "Project Database" templates. The reason is Microsoft missed to update a patch in Windows 7.

2. It fails when provisioning Service Applications or when accessing pages that make service calls:

Solutions:

To resolve this issue you will need to download the KB976462 hotfix which can be found at http://connect.microsoft.com/VisualStudio/Downloads/DownloadDetails.aspx?DownloadID=23806.

Note: From the hotfix i downloaded Windows6.1-KB976462-v2-x64.msu and installed from
Download Windows6.1-KB976462-v2-x64 and install, it will solve the problem.

Tuesday, 21 August 2012

Finding SPListItem by its ID -- Optimized Approach


I just found out that some operations in my SharePoint application run quite slow when used on lists containing large amounts of listitems. In the particular case it was approximately 2,500 items in the list.

The result is: NEVER use this code construction to find an element by its ID:
oList = oWeb.Lists("MyCustomList")     //gets the list object
oItem = oList.Items.GetItemById(123)   //finds the element within the list in the list

You should rather use this one:
oList = oWeb.Lists("MyCustomList")     //gets the list object
oItem = oList.GetItemById(123)         //finds the element within the list in the list

The big mistake is that accessing the “Items” property of the SPList object oList creates an SPQuery object in background to read all the items in particular list and then GetItemById() method of the SPListItemCollection (oList.Items is a SPListItemCollection object) runs a loop, looking for an item with ID attribute set to the value 123.

However, if you use the second code example the SPList ojbect oList creates an SPQuery object in background to read only one object having ID attribute set to 123, i.e.:
<Where><Eq><FieldRef Name="ID"></FieldRef><Value Type="Counter">123<Value></Eq></Where>
and then returns the element it found.

The same applies to the DeleteItemById() method. I had to work around in a bit different manner:

oList.Items.DeleteItemById(123) //this was the original code

oList.GetitemById(123).ListItems.DeleteItemById(123) //this is the improved code
 
As you can see, the improved code first finds the list item by its ID, then accesses the ListItems property (which is again SPListItemCollection) and executes a DeleteItemById() command on the particular collection where the size of the collection is 1. 

Note : Before delete verify whether the item is available or not by using GetItemById() for unwanted failure
 
A really difficult workaround was needed to fix the AddNewItem function where I had code like this:

SPListItem oNewItem;
oNewItem = oList.Items.Add()

Again, accessing the Items attribute leads to reading all the items in the list. To avoid that, I created a SPQuery object that never returned any elements, then called Add() method on the collection returned by the query.

//reads all items having id=0. Should return no rows
oEmptyQuery.Query = "<Where><Eq><FieldRef Name='ID' /><Value Type='Counter'>0</Value></Eq></Where>";
SPListItemCollection oItemColl = oList.GetItems(oEmptyQuery);
SPListItem oNewSPItem = oItemColl.Add();    //adds an item
oNewSPItem["FieldName"] = value;
oNewSPItem.Update()


Happy Coding.................

Unexpected error occured after install SP2010 SP1/December 2011


I have installed SharePoint 2010 in my Laptop and installed SP2010 SP1 then installed December 2011(kb2597014) patch update and security updates (KB2553365, KB2553413, KB2597124) to restore my application backup.
I created a new web application and created top-level site collection, after creation I open the new site in my browser and I got an unexpected error. While view the uls viewer I got the below details.
----------The Error------------
An unexpected error has occurred.  
Troubleshoot issues with Microsoft SharePoint Foundation.
Correlation ID: 456d86f8-64ac-4832-a224-5f6965769fa0
Date and Time: 21/8/2012 2:39:10 PM

----------ULS Details------------

UserProfileApplicationProxy.InitializePropertyCache: System.Configuration.ConfigurationErrorsException: Unrecognized attribute 'allowInsecureTransport'. Note that attribute names are case-sensitive. (C:\Program Files\Common Files\Microsoft Shared\Web Server Extensions\14\WebClients\Profile\client.config line 56)   
 at Microsoft.Office.Server.UserProfiles.MossClientBase`1.ExecuteOnChannel(String operationName, CodeBlock codeBlock)   
 at Microsoft.Office.Server.UserProfiles.ProfilePropertyServiceClient.ExecuteOnChannel(String operationName, CodeBlock codeBlock)   
 at Microsoft.Office.Server.UserProfiles.ProfilePropertyServiceClient.GetProfileProperties()   
 at Microsoft.Office.Server.Administration.UserProfileApplicationProxy.RefreshProperties(Guid applicationID)   
 at Microsoft.Office.Server.Utilities.SPAsyncCache`2.GetValueNow(K key)   
 at Microsoft.Office.Server.Utilities.SPAsyncCache`2.GetValue(K key, Boolean asynchronous)   
 at Microsoft.Office.Server.Administration.UserProfileApplicationProxy.InitializePropertyCache()

System.NullReferenceException: Object reference not set to an instance of an object.  
 at Microsoft.Office.Server.Administration.UserProfileApplicationProxy.get_ApplicationProperties()   
 at Microsoft.Office.Server.Administration.UserProfileApplicationProxy.get_PartitionIDs()   
 at Microsoft.Office.Server.Administration.UserProfileApplicationProxy.IsAvailable(SPServiceContext serviceContext)   
 at Microsoft.Office.Server.WebControls.MyLinksRibbon.get_PortalAvailable()   
 at Microsoft.Office.Server.WebControls.MyLinksRibbon.EnsureMySiteUrls()   
 at Microsoft.Office.Server.WebControls.MyLinksRibbon.get_PortalMySiteUrlAvailable()   
 at Microsoft.Office.Server.WebControls.MyLinksRibbon.OnLoad(EventArgs e)   
 at System.Web.UI.Control.LoadRecursive()   
 at System.Web.UI.Control.LoadRecursive()   
 at System.Web.UI.Control.LoadRecursive()   
 at System.Web.UI.Control.LoadRecursive()   
 at System.Web.UI.Control.LoadRecursive()   
 at System.Web.UI.Control.LoadRecursive()   
 at System.Web.UI.Page.ProcessRequestMain(Boolean includeStagesBeforeAsyncPoint, Boolean includeStagesAfterAsyncPoint)

Then I asked this doubt to Google,  It comes with some result threads, In that I have followed 


Yeah, it fixed my problem.

The Solution is
You might be able to solve the error by simply deleting your User Profile Service Application.
Indeed, this is not best practice obviously, but if you need to get back to working fast, this is a quick solution (hence, this is a ”Quick tip” post).

In order to delete the Service, you need to visit the Central Administration of your SP2010 installation, at the page where the listing of your Service Applications resides (Central Administration > Application Management > Manage Service Applications)

ie. /_admin/ServiceApplications.aspx

Select the User Profiles Service Application proxy and then, from the ribbon options, select Delete.
As I said before, this is hardly best practice but, still, it will help you get back to work until a more suitable solution comes around.

Monday, 13 August 2012

Configure Outgoing Email Settings in SharePoint 2010


Configure outgoing e-mail for a farm

You can configure outgoing e-mail for a farm by using the SharePoint Central Administration Web site or by using the Stsadm command-line tool. Use the following procedures to configure outgoing e-mail. After you complete the procedures, end users can track changes and updates to individual site collections. In addition, site administrators can, for example, receive notices when users request access to a site.

To configure outgoing e-mail for a farm by using Central Administration

1.      Verify that you have the following administrative credentials: You must be a member of the Farm Administrators group on the computer that is running the SharePoint Central Administration Web site.
2.      In Central Administration, click System Settings.
3.      On the System Settings page, in the E-Mail and Text Messages (SMS) section, click Configure outgoing e-mail settings.
4.      On the Outgoing E-Mail Settings page, in the Mail Settings section, type the SMTP server name for outgoing e-mail (for example, mail.example.com) in the Outbound SMTP server box.
5.      In the From address box, type the e-mail address as you want it to be displayed to e-mail recipients.
6.      In the Reply-to address box, type the e-mail address to which you want e-mail recipients to reply.
7.      In the Character set list, select the character set that is appropriate for your language.
8.      Click OK.

To configure outgoing e-mail for a farm by using the Stsadm command-line tool

1.      Verify that you have the following administrative credentials: You must be a member of the Administrators group on the local computer.
2.      On the drive on which SharePoint Products and Technologies is installed, change to the following directory: %COMMONPROGRAMFILES%\Microsoft shared\Web server extensions\14\Bin.
3.      Type the following command, and then press ENTER:
stsadm -o email
-outsmtpserver <SMTP server name>
-fromaddress <valid e-mail address>
-replytoaddress <valid e-mail address>
-codepage <valid code page>
Example
stsadm -o email -outsmtpserver mail.example.com -fromaddress someone@example.com -replytoaddress someone@example.com -codepage 65001
For more information, see Email: Stsadm operation (Office SharePoint Server) (http://go.microsoft.com/fwlink/p/?LinkId=150045).

Configure outgoing e-mail for a specific Web application

You can configure outgoing e-mail for a specific Web application by using the Central Administration Web site or by using the Stsadm command-line tool. Use the following procedures to configure outgoing e-mail. After you complete the procedures, end users can track changes and updates to individual site collections. In addition, site administrators can, for example, receive notices when users request access to a site.

Note:
If you want to configure outgoing e-mail for a specific Web application, you must first configure the default outgoing e-mail for all Web applications in the farm. If you configure the outgoing e-mail for a specific Web application, that configuration will override the default configuration for all Web applications in the farm.

To configure outgoing e-mail for a specific Web application by using Central Administration

1.      Verify that you have the following administrative credentials: You must be a member of the Farm Administrators group on the computer that is running the SharePoint Central Administration Web site.
2.      In Central Administration, in the Application Management section, click Manage web applications.
3.      On the Web Applications Management page, select a Web application, and then in the General Settings group on the Ribbon, click Outgoing E-mail.
4.      On the Web Application Outgoing E-Mail Settings page, in the Mail Settings section, type the SMTP server name for outgoing e-mail (for example, mail.fabrikam.com) in the Outbound SMTP server box.
5.      In the From address box, type the e-mail address (for example, the site administrator alias) as you want it to be displayed to e-mail recipients.
6.      In the Reply-to address box, type the e-mail address (for example, a help desk alias) to which you want e-mail recipients to reply.
7.      In the Character set list, click the character set that is appropriate for your language.
8.      Click OK.

To configure outgoing e-mail for a specific Web application by using the Stsadm command-line tool

1.      Verify that you have the following administrative credentials: You must be a member of the Administrators group on the local computer.
2.      On the drive on which SharePoint Products and Technologies is installed, change to the following directory: %COMMONPROGRAMFILES%\Microsoft shared\Web server extensions\14\Bin.
3.      Type the following command, and then press ENTER:
stsadm -o email
-outsmtpserver <SMTP server name>
-fromaddress <valid e-mail address>
-replytoaddress <valid e-mail address>
-codepage <valid code page>
[-url <URL name> ]
Example
stsadm -o email -outsmtpserver mail.example.com -fromaddress someone@example.com -replytoaddress someone@example.com -codepage 65001 -url http://server_name
For more information, see Email: Stsadm operation (Office SharePoint Server) (http://go.microsoft.com/fwlink/p/?LinkId=150045).

Reference : http://technet.microsoft.com/en-us/library/cc263462.aspx

Saturday, 11 August 2012

Check Version and Patch details in SharePoint 2010

Method 1: Through SharePoint 2010 Central Administration:
  1. Open SharePoint 2010 Central Administration
  2. Click on the link for System Settings
  3. Click the link for Manage Servers in This Farm
  4. Look at the Configuration Database Version field


Method 2: A detailed list through SharePoint 2010 Central Administration:
  1. Open SharePoint 2010 Central Administration
  2. Click on the link for Upgrade and Migration
  3. Click the link for Check Product and Patch Installation Status
  4. Look at the Version column for the release your server is at


  • There is a view button in the top left that will change the list from the farm to individual servers in the farm
  • At the top of the page a link labeled Click here for the latest information on available updates for SharePoint 2010 Products will take you to a list of all cumulative updates for SharePoint.
  • Any Hotfix will show under the product it applied to (my screenshot shows an RTM server with no hotfix installed)
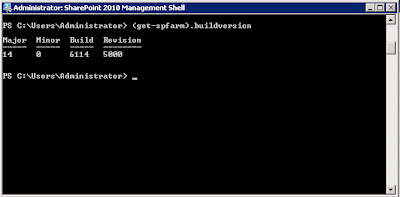
Method 3: PowerShell
  1. Open SharePoint 2010 Management Shell from the Start menu (right-click and select Run as Administrator)
  2. Type  (get-spfarm).buildversion or get-spfarm | select buildversion


Reference:
http://www.bradleyschacht.com/check-version-of-sharepoint-2010-currently-installed/

Sunday, 5 August 2012

Just-in-time-debugging error in SharePoint 2010

Hi All,

Recently i have encountered the just-in-time-debugging error in my SharePoint site. I got this error while opening a document library. Then i come to know that, this is a window feature that is starting auomatically Visual Studio debugger when a software its' giving a fatal error.

Also got solution to disable this windows feature

Go to Control Panel  --> Internet Options --> Advanced, then select following two check boxes:

- Disable Script Debugging (Internet Explorer)
- Disable Script Debugging (Others)


This is really working ;)

Saturday, 4 August 2012

Change Central Admin Port in SP2010

Hi All,

I need to change my SharePoint Central Administration port number, then i found a way to do this using powershell

The Powershell script is Set-SPCentralAdministration -Port <portnumber>

Refer the below snapshot


Done... I achieved this.