Search This Blog

Friday 30 March 2012

Handling WebApplication web.config in SharePoint2010

Handling web.config file for adding encryptionkey

Step 1:

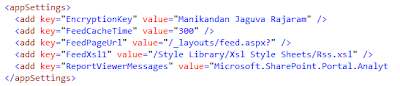
Need to add the key and value in the respective web application web.config file

Open the web.config

C:\inetpub\wwwroot\wss\VirtualDirectories\2020\web.config
Under the <appSettings> tag add your new key and value, refer the below snapshot


Step 2:

Access the key in your Webpart/Application Page

Add Reference - System.Configuration
Namespace:  System.Configuration
Assembly:  System.Configuration (in System.Configuration.dll)


Then get your current site and open the webconfiguration, refer the below snapshot


Web.Config file. Why?
You want to change your key. But you are not the developer? Or you do not even have the source! Then what? Thanks to the Web.configfile idea. Keep your secret key in the config file. Change it when you need to.


Thursday 22 March 2012

Working with SPList Attachements


Here, I am going to share my experience with SPList Attachments.


ADDING AN ATTACHMENT TO AN ITEM IN SPLIST :
 private void AddNewAttachment(int ItemID)
        {

            try
            {

                SPList myList = SPContext.Current.Web.Lists["Item List"];

                SPListItem myNewItem = myList.GetItemById(ItemID);

                if (fileUpload.PostedFile != null && fileUpload.HasFile)
                {

                    Stream fStream = fileUpload.PostedFile.InputStream;

                    byte[] contents = new byte[fStream.Length];

                    fStream.Read(contents, 0, (int)fStream.Length);

                    fStream.Close();

                    fStream.Dispose();

                    SPAttachmentCollection attachments = myNewItem.Attachments;

                    string fileName = Path.GetFileName(fileUpload.PostedFile.FileName);

                    attachments.Add(fileName, contents);

                    myNewItem.Update();

                }

            }

            catch (Exception eAdd)
            {

                string errAdd = eAdd.Message;

            }

        }

DELETING ATTACHMENTS FROM SPLIST :
private void DeleteAttachment(int ItemID)
        {

            try
            {

                SPList myList = SPContext.Current.Web.Lists["Item List"];

                SPListItem delItem = myList.GetItemById(ItemID);

                SPAttachmentCollection attachments = delItem.Attachments;

                if (attachments != null && attachments.Count > 0)
                {
                    foreach (string file in attachments)
                    {
                        if (file != String.Empty)
                        {
                            attachments.Delete(file);
                        }
                    }
                }
                delItem.Update();
            }

            catch (Exception eDel)
            {

                string errDel = eDel.Message;

            }
        }

DOWNLOADING THE ATTACHMENT :
Find the download link first, when click on the link it will download the file.

private void DownloadAttachment(int ItemID)
        {
            try
            {
                string attachmentUrl = "", sectionAttachments = "";

                SPList myList = SPContext.Current.Web.Lists["Item List"];

                SPListItem attItem = myList.GetItemById(ItemID);

                 SPAttachmentCollection attachments = attItem.Attachments;
                if (attachments != null && attachments.Count > 0)
                {
                    sectionAttachments = "<table width='100%' cellpadding='5'><tr><td class='jobAidSectionName'>Attachment(s):</td></tr>";
                    foreach (string file in attachments)
                    {
                        if (file != String.Empty)
                        {
                            attachmentUrl = "/Lists/" + myList + "/Attachments/" + ItemID.ToString() + "/" + file.ToString();
                            sectionAttachments = sectionAttachments + "<tr><td><a class='documentInlineLink' style='padding-left:0px;' href='" + attachmentUrl + "'>- " + file + "</a></td></tr>";
                        }
                    }
                    sectionAttachments += "</table>";
                }
            }
            catch (Exception eDwn)
            {
                string errDwn = eDwn.Message;
            }
        }

Adding Custom CSS in SharePoint 2010 Master Page

In this post we are going to see how to add custom css in SharePoint 2010 Master Page:

My CSS

body

{

text-align: left;

font-family: Arial, san-serif;

font-size: 11px;

line-height: 1.2em;

color: #000;


}

/* MASTER CSS corev4.css */

.s4-title{

padding:0px 0px 0px 0px;

margin:0px;

min-height:64px;

/* [ReplaceColor(themeColor:"Light2")] */ background-color:#67953F;

word-wrap:break-word;

-ms-word-wrap:break-word;

overflow-x:hidden;

}

.ms-cui-topBar2

{

padding:0px;

margin:0px;

background-color:#5b5c6a;

}

.s4-tn{

padding:0px;

margin:0px;

background-color:#5b5c6a;

}

.s4-titletable

{

background-color:#67953F;

}

.ms-cui-tt-span

{

background-color:#67953F;

color:white!important;

}

.s4-toplinks

{

padding:0px;

background-color:#67953F;

color:white!important;

}

.menu-horizontal

{

display:table;

}

.menu-horizontal .menu-item-text

{

padding-top : 0px;

color : white;

}

.s4-tn li.static > .menu-item{

/* [ReplaceColor(themeColor:"Dark2")] */ color:white;

white-space:nowrap;

border:1px solid transparent;

padding:4px 10px;

height:15px;

vertical-align:middle;

background-color:#67953F;

}

.s4-tn li.static > a:link

{

/* [ReplaceColor(themeColor:"Accent1")] */ color:white;

text-decoration:none;

}


.s4-tn li.static > a:hover

{

/* [ReplaceColor(themeColor:"Accent1")] */ color:white;

text-decoration:none;

}


saved this as CustomStyle.css in Style Library. Refer this in css from Master Page

Open your master page in SharePoint Desinger and have a look in the head tag. here we can register our custom css with SharePoint:CssRegistration control. Below i have posted code snippet from my master page.

 <SharePoint:CssLink runat="server" Version="4"/>
 <SharePoint:CssRegistration runat="server" After="Core4.css" Name="/Style Library/CustomStyle.css"></SharePoint:CssRegistration>


How to Get\Set Lookup Field using ECMAScript SharePoint 2010

In this post we will explain how to get and set a lookup field using Ecmascript

Firstly, to get or retrieve a lookup field value see the below example -
function GetLookupValue()
{
var context = new SP.ClientContext.get_current();
var web = context.get_web();
var list = web.get_lists().getByTitle(‘Testlist’);
var query = SP.CamlQuery.createAllItemsQuery();
allItems = list.getItems(query);
context.load(allItems, ‘Include(Title,Department)’);
context.executeQueryAsync(Function.createDelegate(this, this.success), Function.createDelegate(this, this.failed));
}
function success() {
var TextFiled = “”;
var ListEnumerator = this.allItems.getEnumerator();
while(ListEnumerator.moveNext())
{
var currentItem = ListEnumerator.get_current();
TextFiled += currentItem.get_item(‘Title’) + ‘-’ +currentItem.get_item(‘Department’).get_lookupValue() + ‘\n’;
}
alert(TextFiled);
}
function failed(sender, args) {
alert(“failed. Message:” + args.get_message());
}


In the above ECMAScript Department is the Lookup and currentItem.get_item(‘Department’).get_lookupValue() will get you the value of the Lookup item selected.

Next Lets look at how to set a Lookup Field.

In this part we will look at how to set a lookup field value using ECMAScript.
function SetLookupValue()
{
var context = new SP.ClientContext.get_current();
var web = context.get_web();
var list = web.get_lists().getByTitle(‘Testlist’);
var query = SP.CamlQuery.createAllItemsQuery();
allItems = list.getItems(query);
context.load(allItems, ‘Include(Title,Department)’);
context.executeQueryAsync(Function.createDelegate(this, this.success), Function.createDelegate(this, this.failed));
}
function success() {
var TextFiled = “”;
var ListEnumerator = this.allItems.getEnumerator();
while(ListEnumerator.moveNext())
{
var currentItem = ListEnumerator.get_current();
var _newLookupField = new SP.FieldLookupValue();
newLookupField.set_lookupId(10) -> Updated with some lookup value for Department column
currentItem.set_item(‘Department’, newLookupField);
currentItem.update();
// Call context.executeQueryAsync again
}
}
function failed(sender, args) {
alert(“failed. Message:” + args.get_message());
}
In the above code snippet we are trying to set the value of ‘Department’ column for each item in the ‘Testlist’ . After currentItem.update(); statement you would need to call context.executeQueryAsync again to commit the changes.


Get values from SharePoint 2010 lookup field in a listbox

This is an example for adding values from a SharePoint 2010 lookup filed into a asp.net listbox control using SharePoint 2010 client Object Model.


ClientContext clientContext = new ClientContext(“https://mySPsite”);
List list = clientContext.Web.Lists.GetByTitle(“MYList”);
CamlQuery camlQuery = new CamlQuery();
camlQuery.ViewXml = “<View/>”;
ListItemCollection listItems = list.GetItems(camlQuery);
clientContext.Load(listItems);
clientContext.ExecuteQuery();
foreach (ListItem listItem in listItems)
{
// Get value
SP.FieldLookupValue _value = listItem.FieldValues["MyLookupFieldID"] as SP.FieldLookupValue;
var mylookupvalue= _value.LookupValue;
listBoxControl1.Items.Add(mylookupvalue);
}